The stable version is our first priority and the main distribution version. Since it is the major release, it comes out periodically. Stable releases take more time to manufacture, but new features become available in the next version. For example: A version can have a new theme and feature, and in the next version, this theme and feature can be removed, improved or changed. As can be understood from the name of Stable, this version is more stable because it is controlled accordingly to make it work better on the platform it is suitable for.
Stable release are here, and then select the architecture of your computer.
Nightly.
This version contains the latest commits available on GitHub, and the latest enhancements and features are added daily. This version may not be as stable as Stable version because it is built daily, but this does not mean that it is not stable.
The current nightly is here. There are several files you can download in these folders. For a new installation you want RetroArch.7z or the setup package (RetroArch-20XX-XX-XX-setup.exe).
Installing.
If you pick the 7z archive package, extract it in a folder that doesn't require administrator permissions such as C:\Users\yourusername\RetroArch or any other drive. Don't extract it to Program Files or your Windows folder. This could case some issues.
Updating.
You can update the installation by downloading the latest 20XX-XX-XX-RetroArch.7z package and overwriting the executable.
If you pick the installer package we recommend to use the default location, follow the installation steps and you should be good to go. You can update the installer version by downloading the latest version and re-running the installer.
Starting RetroArch.
WARNING
If you were running a stable release prior to 1.4.0. you will need to update the system libraries. You can do so by downloading the full RetroArch.7z package or redist.7z from the download locations.
On the first run you will be greeted by this screen:
From here you can launch content, change settings and build up your content collection. Keyboard Controls
The RetroArch user interface is designed with gamepad navigation in mind but it also features robust keyboard and mouse support. Learn more about keyboard input at Input and Controls.
Gamepad Controls
XINPUT controllers should work out of the box. If the controller can be autoconfigured the OSD will inform you of the autoconfiguration event. We also include autoconf profiles for many popular controllers. If your controller doesn't auto configure you can follow this procedure:
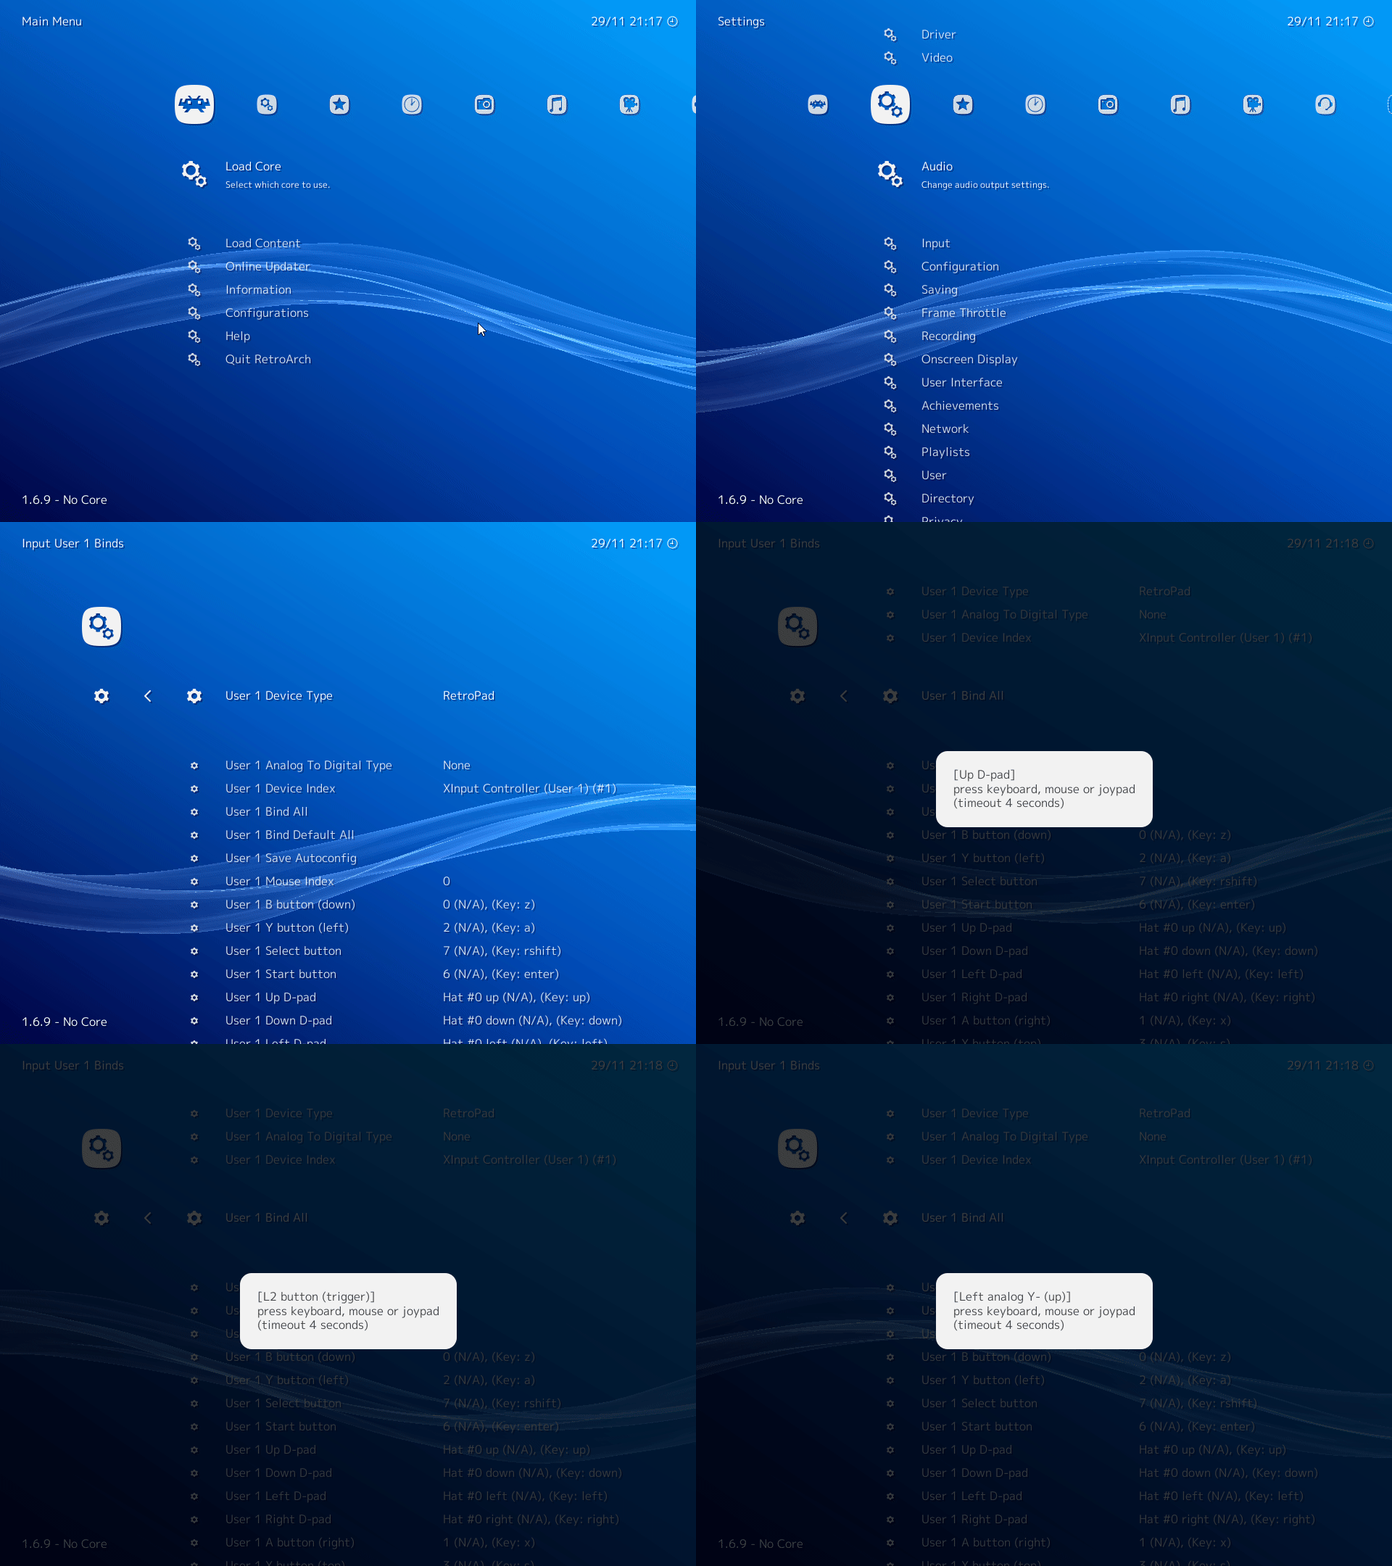
- Navigate to Settings
- Navigate to Input
- Navigate to Input User 1 Binds
- Select User 1 Bind All
- Press the buttons as required
TIP
If you have several different controller types you may want to use the User 1 Save Autoconfig followed by User 1 Bind Default All options after binding in order to achieve hotplug functionality
Directory Configuration¶ Configuring directories is an important aspect to get the best RetroArch experience possible. To configure the directories follow these steps:
- Navigate to Settings
- Navigate to Directory
- Select the directory you want to changed
- Navigate to the desired location
You should always configure the following paths:
- System Directory for system files
- Savefile Directory for save files
- Savestate Directory save state files
- Browser Directory for your content
TIP
The Browser Directory is used as a startup location which allows easy access to your content library.
Installing Cores
RetroArch requires cores to run any content. You can download cores directly from RetroArch's interface by following this procedure:
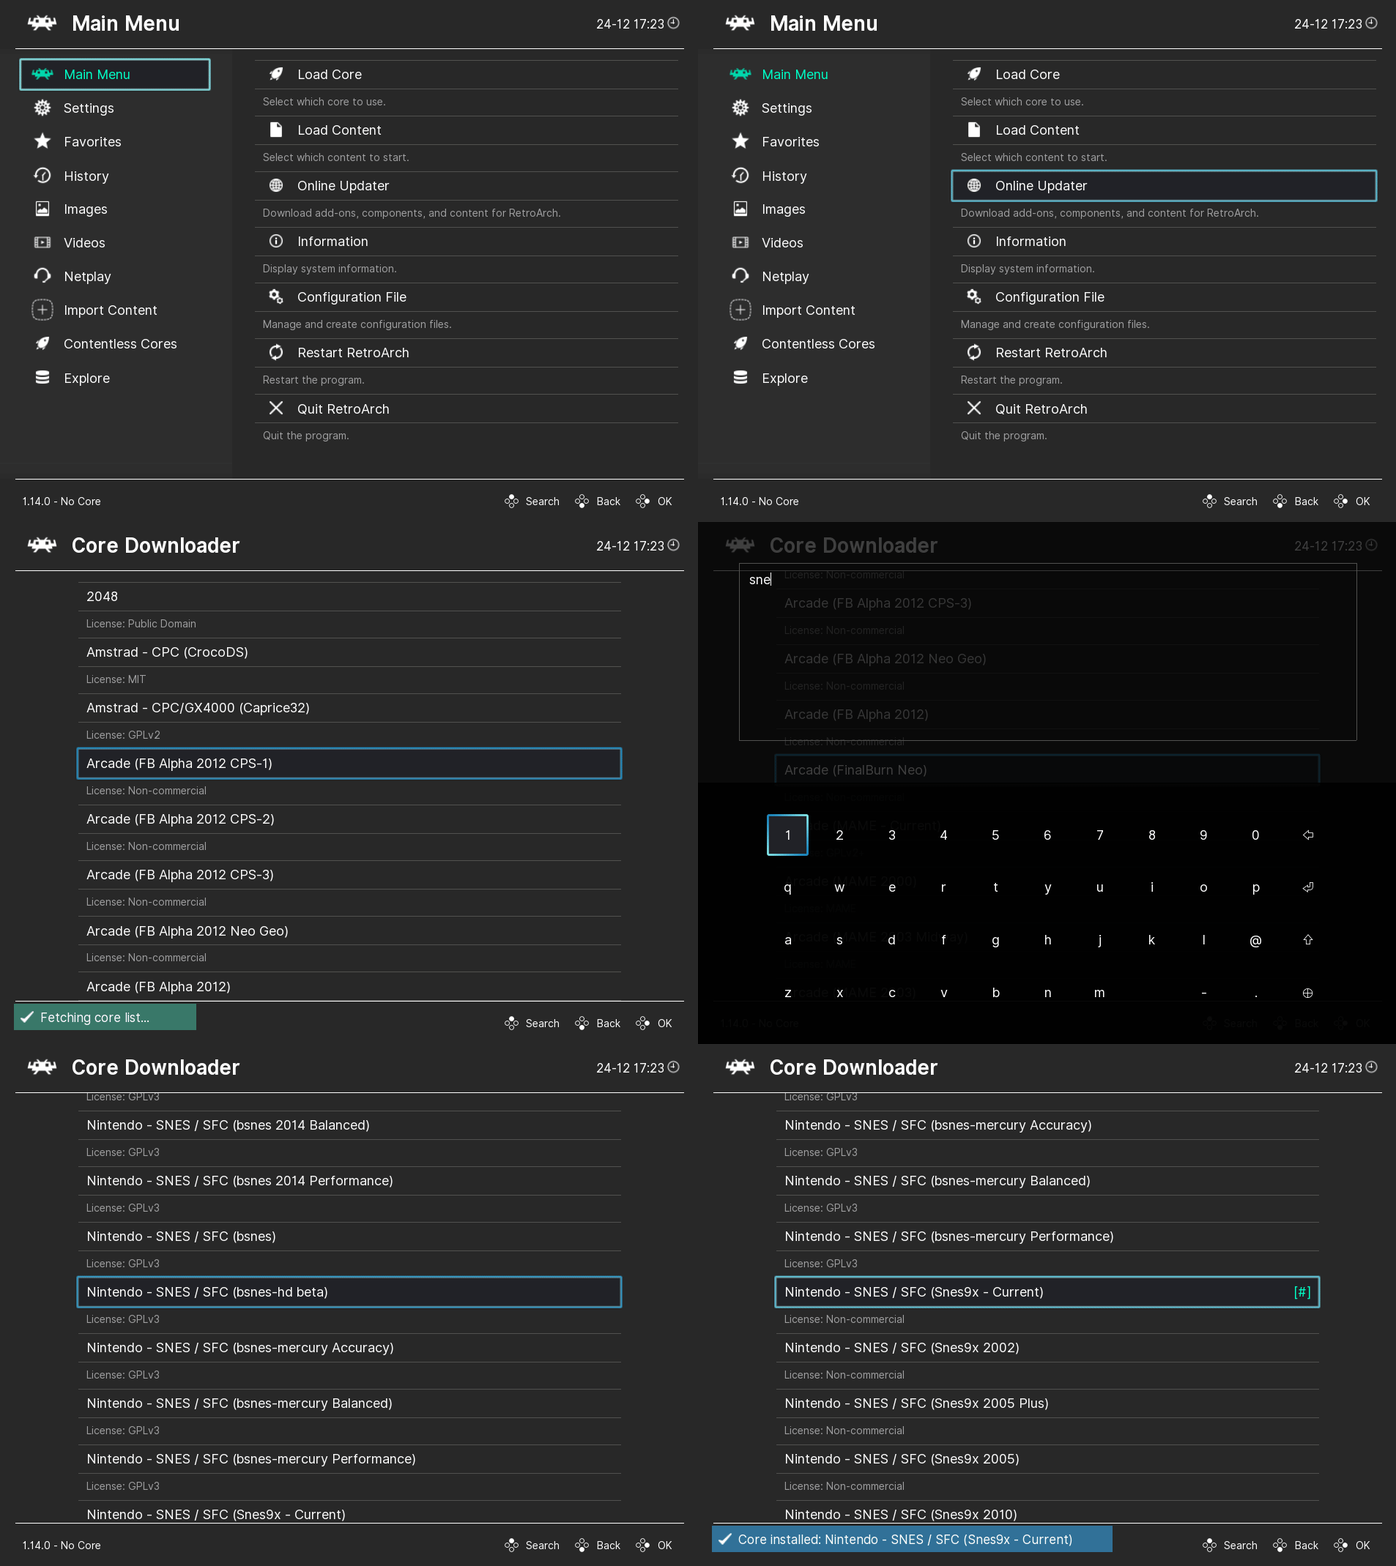
- Navigate to Online Updater
- Navigate to Select Core Downloader
- Select the core you want to download
Running Content
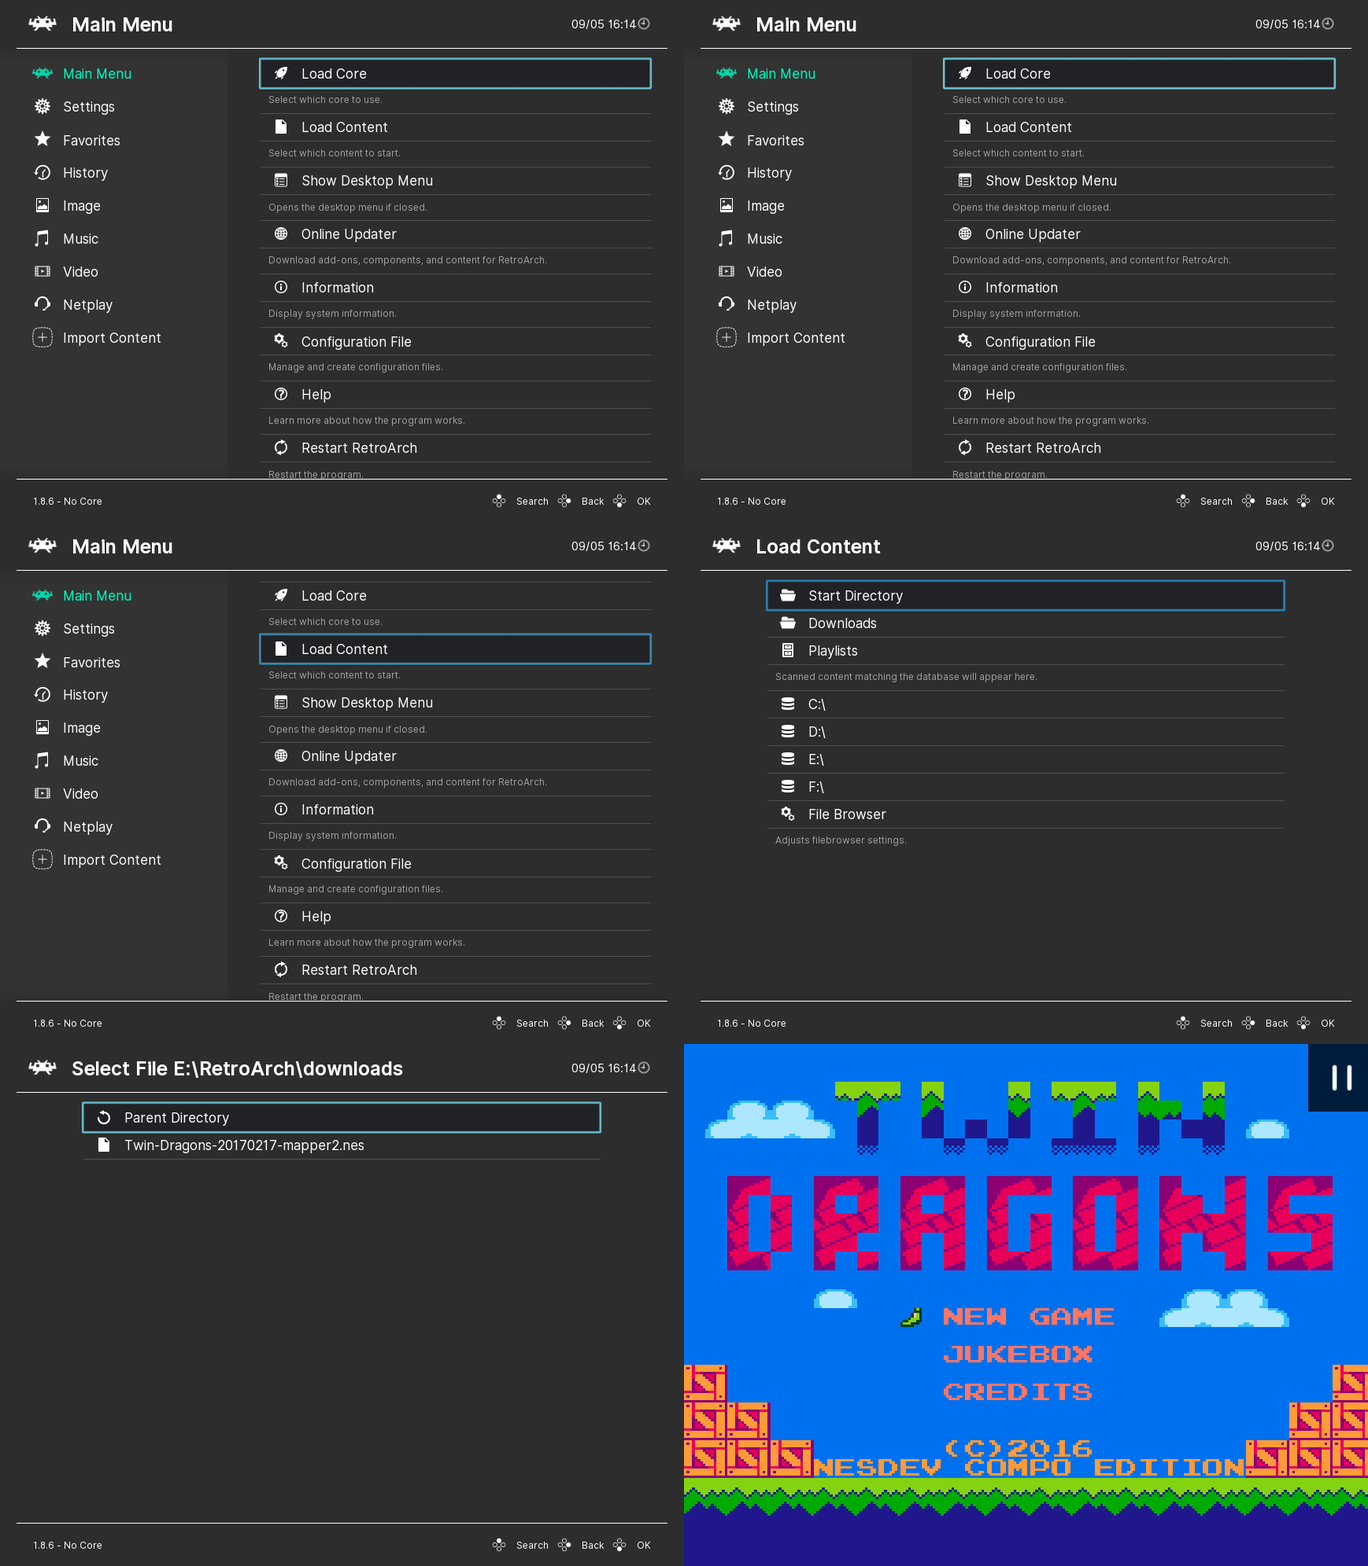
After you have installed one or more cores you can run your content following this procedure:
- Navigate to Load Content
- Browse to the folder that contains the content you want to run
- Select the content that you want to run
- If you have more than one compatible core you will be asked to select the core you want to use for that purpose
TIP
By default loading content will trigger a content scan. If your content matches with any of our databases it will be added to a playlist for easy access. You can find the playlists by navigating to the right of the main menu. Every content you launch is added to a history playlist that you can use to load it again quickly at any time
Glossary
Here is the list of terms in a LibRetro, RetroArch or platform subject, field, or area of usage, with accompanying definitions.
frontend-
A frontend is a program designed to run libretro cores such as Kodi's RetroPlayer, RetroArch, Phoenix, Minir
core-
A core is a program that has been ported to the libretro API and runs inside a libretro frontend
content-
Content can be a game, an image, a video, an audio file that is executed by a core. In most cases contents are the ROMs of an emulated platform
Best video game consoles
retropad-
RetroPad is libretro’s input abstraction controller, it’s the interface between the physical controller and the core inputs
save files-
Save files are saves that are made from within a game, usually cross platform and should work across emulators in most cases
save states-
Save states are snapshots of the content memory at a particular moment, these are not always cross platform and most certainly won’t work on a different emulator than the one used to create them
system files-
Additional files that might or not be part of the romset that might be needed to get some content to work (usually referred to by the BIOS term)
autoconf-
A configuration file that has button definitions for a particular gamepad
Comments
Post a Comment
Do not insert clickable links or your comment will be deleted. Checkbox Send me notifications to be notified of new comments via email.