1: Add the Run command to the Start Menu
Beginning way back with the release of Windows 1.0, Microsoft has been all about the GUI interface (more or less effectively).
But sometimes you just want to run a program without having to navigate the GUI maze of menus and folders. Windows Vista, by default,
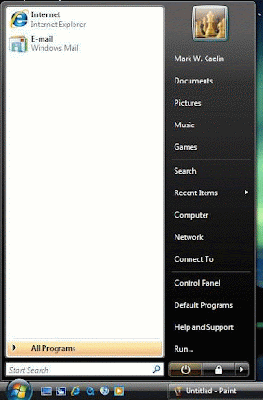
does not include the Run command on the Start Menu. This was a common and favorite feature of Windows XP.
To add the Run command back to the Vista Start Menu, follow these steps:
- Right click the Taskbar in an open area
- Click on Properties
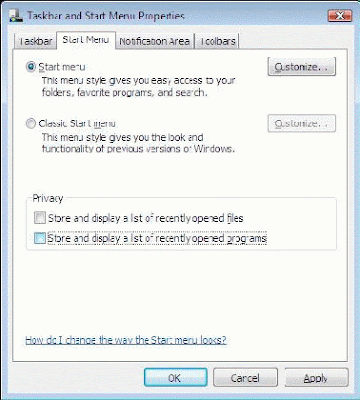
- Click on the Start Menu tab (See Figure A)
Figure A
Taskbar and Start Menu Properties
- Click the Customize button to get to the Customize Start Menu
- Scroll down the list until you find the Run command checkbox and check it (See Figure B).
- Click OK and the Run command will now appear on the Start Menu.
Figure B
Customize Start Menu
2. Disable the Welcome Center and Sidebar
The Windows Vista default setting is to show the Welcome Center on startup. While the Welcome Center is mildly interesting the first time you see it, you will quickly tire of it appearing every time you boot your Vista PC. This behavior is easily changed by unchecking the Run a Startup button located at the bottom of the Welcome Center as shown in Figure C.
Figure C
Welcome Center
Similarly, the Vista Sidebar is also on by default. While some users will find the Sidebar and its widgets useful, many will desire the desktop real estate and underlying resources for other more productive uses. You can turn the Sidebar off by:
- Right clicking the Windows Sidebar icon in the system tray
- Click Properties
- Uncheck the Start Sidebar when Windows starts checkbox (See Figure D)
- Click OK
Figure D
Windows Sidebar Properties
3: Change the Product Key
A Windows Vista installation disk essentially has all of the various editions of Vista included on that one disk. Which version gets installed is dependent on what product key you enter during the installation process. At some point you may want to upgrade your current version to a version with more bells and whistles, which would require a new Product Key.
Or you may want to Activate your Windows Vista under a different Product Key for some reason. The easiest way to change your Product Key is through the System applet in the Control Panel. (See Figure E)
Figure E
System applet
Figure F
Windows Activation
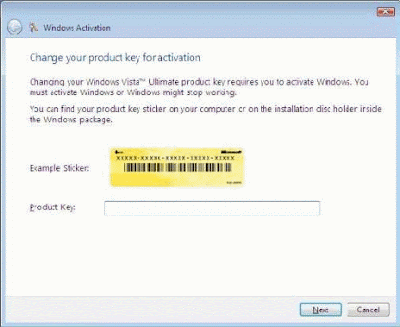
Under the Windows Activation section there is a link: Change Product Key. Clicking that link brings up the screen shown in Figure F where you can enter in a different Product Key.
4: Start Windows Explorer at somewhere other than documents
Figure G
Windows Explorer Properties
While Windows Vista has desktop search that will theoretically allow you the option of merely typing in a location on your hard disk to get an Explorer view, some users will undoubtedly prefer to use Windows Explorer. By default, Windows Explorer in Vista shows you the files located in the user Documents folder. Follow these steps to have Windows Explorer start in a different folder:
- Copy the Windows Explorer shortcut, usually found in the Start Menu under Accessories, to the Desktop.
- Right click the shortcut and click properties.
- Click on the Shortcut tab to get the window shown in Figure G.
- Change the Target filed to the desired location.
For example, to have Windows Explorer start at C:\ type in"
C:\Windows\explorer.exe /n, /e, c:\
5: Privacy tweak
As a convenience, Windows Vista by default saves and displays a list of recently opened files and programs on the Start Menu.
Ostensibly, this is supposed to make it easier to find a file or program. However, many users would prefer that information to remain hidden. Here is how to turn it off:
- Right click the Taskbar and click Properties on the resulting menu
- Click the Start Menu tab
- Uncheck the checkboxes under Privacy (See Figure H)
- Click OK
Figure H
Privacy settings
6: Smaller icons on Start Menu
The icons located on the Windows Vista Start Menu default to large (Figure I).
Figure I
Large icons
For many users, the personal preference will be for those icons to be much smaller. Here is how:
- Right click the Taskbar and click on Properties
- Click the Start Menu tab
- Click the Customize button
- Scroll down to the bottom of the list (See Figure J)
- Uncheck the Use large icons checkbox
- Click OK twice
Figure J
No more large icons


Comments
Post a Comment
Do not insert clickable links or your comment will be deleted. Checkbox Send me notifications to be notified of new comments via email.