The idea is that if you're using Windows or Windows 11 for the first time, you'll have the tools to master its features and get the most out of it. We also want to help power users discover some new things on our list.
And as we always say at Xataka Basics, if you're a Windows 11 expert and there's a good trick we've missed, we invite you to share it with everyone in the comments section . That way, less-experienced users can also benefit from the knowledge of our users.
Access the old Windows 10 right-click menu
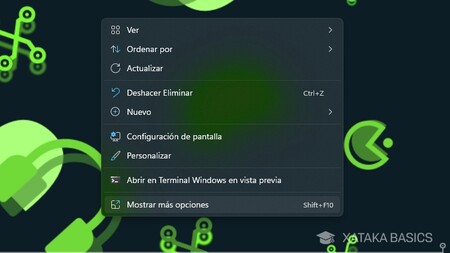
Windows 11 is changing the context menu for the first time in a long time. This means that when you right-click on an item, the menu that appears is new, and it lacks many features that the Windows 10 context menu had . Fortunately, you always have the option to explore that other menu with the rest of the options.
All you have to do is right-click on an item and click Show more options , which is the last option listed in the context menu. This will open the menu we've seen in other versions with more options.
Change the screen refresh rate
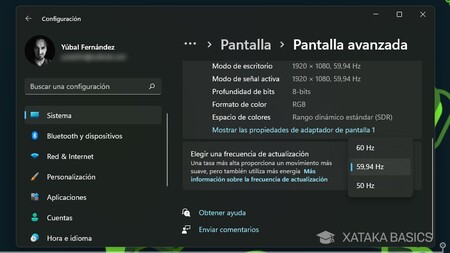
Imagine you have a 120Hz display, but for whatever reason you want to leave it at 60Hz. Perhaps to save battery life on a laptop, for example. This is a setting you can change manually . All you have to do is go to the appropriate settings, which are a bit hidden.
- To activate this option, go to Windows settings.
- Inside, go to System .
- Now, go to Display .
- Here, find and tap the Advanced Display option . It's near the bottom.
- You will enter a menu where you only have to display the options to Choose a refresh rate .
One terminal to rule them all
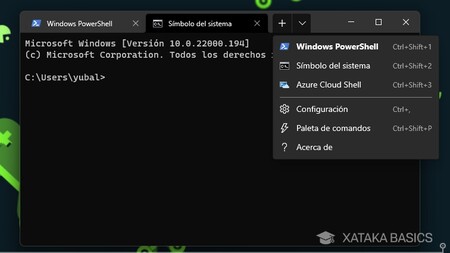
Until now, to change settings using commands in the Windows Terminal, you had to choose between using PowerShell or the Command Prompt. Now, that's gone; Windows has launched a Windows Terminal app where you can open either one in multiple tabs.
Simply search for the Windows Terminal app . Once there, you'll be able to add different tabs. By default, only one type of tab will be added: PowerShell. However, using the down arrow next to the new tab button, you can also choose whether to use the Command Prompt or Azure Cloud Shell tabs.
Record what happens on the screen
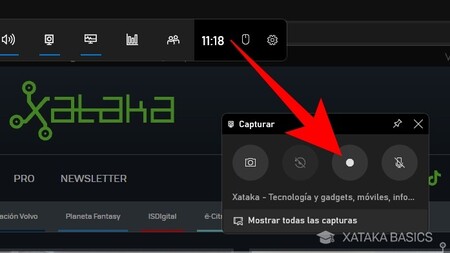
Just like Windows 10, Windows 11 has a built-in screen recorder that you can use to record anything you do in an app or window. You won't be able to record your screen on the desktop or File Explorer, but you can record what you do anywhere else.
All you have to do is press the Windows + G keys on your keyboard at the same time to open the Xbox Game Bar. Here, you will have a button to activate the Capture widget , which is the one used to record the screen.
Organize your virtual desktops
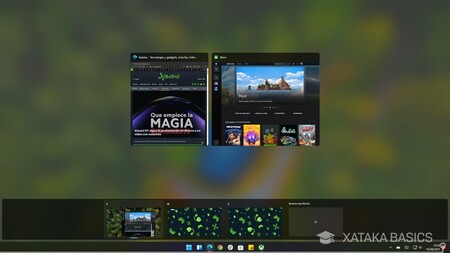
The other big step is getting familiar with managing virtual desktops in Windows 11. If you press Windows + Tab, you'll open the virtual desktops , which will appear below. You can create new desktops or delete existing ones, and you can assign a different name to each one.
You can then move between desktops by pressing Control + Windows + Left or Right to navigate to the next or previous desktop. The idea is that you can have different applications on each desktop, thus separating your work environment from your leisure time. Additionally, in the desktop view of Windows + Tab , you can drag open applications on one desktop to move them to another without closing them.

How to download the Windows 11 ISO image to install it from scratch on any computer
Different wallpapers on each desktop
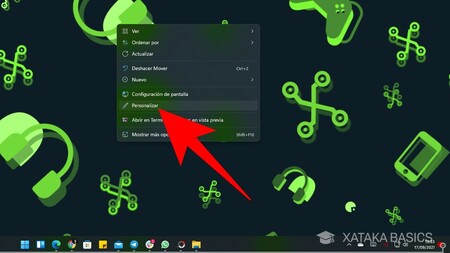
Finally, you should know that in Windows 11 you can set a different wallpaper for each desktop, so that each one's context is more distinct or differentiated thanks to this background. This way, they won't all look the same, and you'll gain the ability to have different decorations on each one.
To do this, simply right-click on the desktop wallpaper, and in the menu that appears, click on Personalization. There you can choose a specific wallpaper for that desktop.
Decide which apps send notifications

All the apps you install will be able to send you notifications. But you may find that notifications from a specific app are too repetitive, or you'd prefer to have them displayed but not make sounds when it comes to a specific app. To do this, you can configure Windows 11 notifications to suit your needs.
- Go to Windows Settings.
- Go to the System section .
- Tap the Notifications option .
- If you scroll down a bit, you'll see a list of your installed apps.
- When you tap on one of the apps, you can separately configure its notifications.
Quick settings from the notification itself
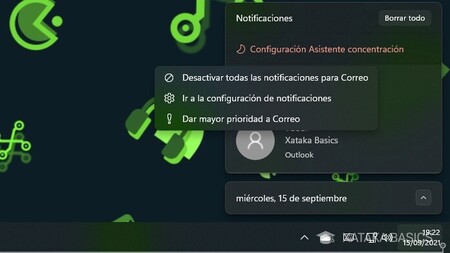
You should also know that there are some changes you can make from the notification itself. When one appears, tap the three-dot button and a small options menu will appear. It's a small menu, but from there you can disable all notifications from the app that sent it, or give it a higher priority. You can also access the app's notification settings.
You can reply from the notifications themselves
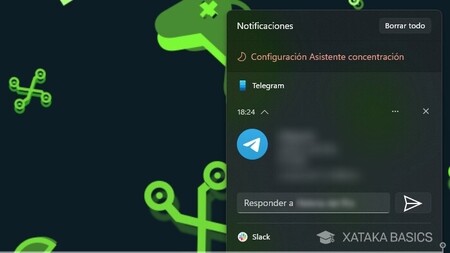
There are some notifications that are interactive, such as those from messaging apps. If the developers of these apps have put a lot of thought into it, you'll find that you can reply from the notification itself in a text field within them.
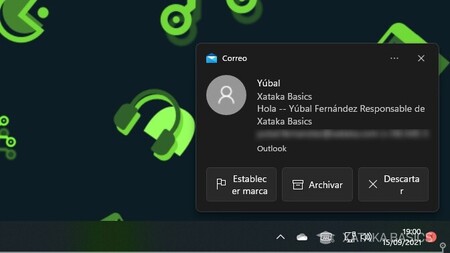
There will be other notifications you won't be able to reply to, but you will find different ways to interact with the content within them. For example, in the Mail app, you can archive, discard, or flag incoming emails.
Use the focus assistant
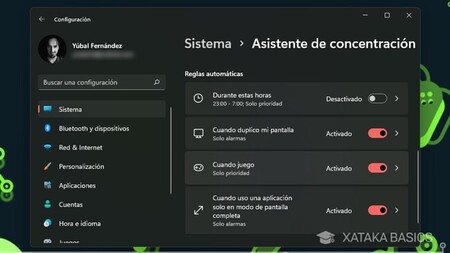
Another option for notifications is to use Focus Assist. This allows you to set times or hours when you don't want notifications to appear , or at least when you don't want unimportant ones to appear. When you enter Focus Assist's settings, you'll have three different options. You can keep it disabled, which is the default setting, but you can also enable it to show only high-priority notifications or none at all except for operating system alarms.
You can also activate a summary mode so that when you turn off this assistant, you can see the notifications you missed. Simply activate the mode you want to use. You can also configure it to activate at specific times, or when you open any app. This way, if you open a game, for example, you'll be sure there are no notifications bothering you.
Comments
Post a Comment
Do not insert clickable links or your comment will be deleted. Checkbox Send me notifications to be notified of new comments via email.